Architecting and Validating a High-Availability Redis Cluster on Kubernetes
When you first learn Kubernetes, you spend most of your time dealing with stateless applications (like a Node.js API or a React frontend). If a stateless pod dies, Kubernetes spins up a new one, and nobody notices.
But what happens when you need to deploy a Stateful application, like a Database or a Cache?
Recently, my development team needed a robust caching layer. Instead of spinning up a standard, single-pod Redis instance, I architected a High-Availability (HA) Redis Master-Replica Cluster on our Kubernetes environment.
Unlike standard Deployments, running a distributed database requires strict pod ordering, persistent storage, and sticky network identities. Here is a breakdown of how I designed the architecture, deployed the infrastructure, and rigorously validated the replication network.
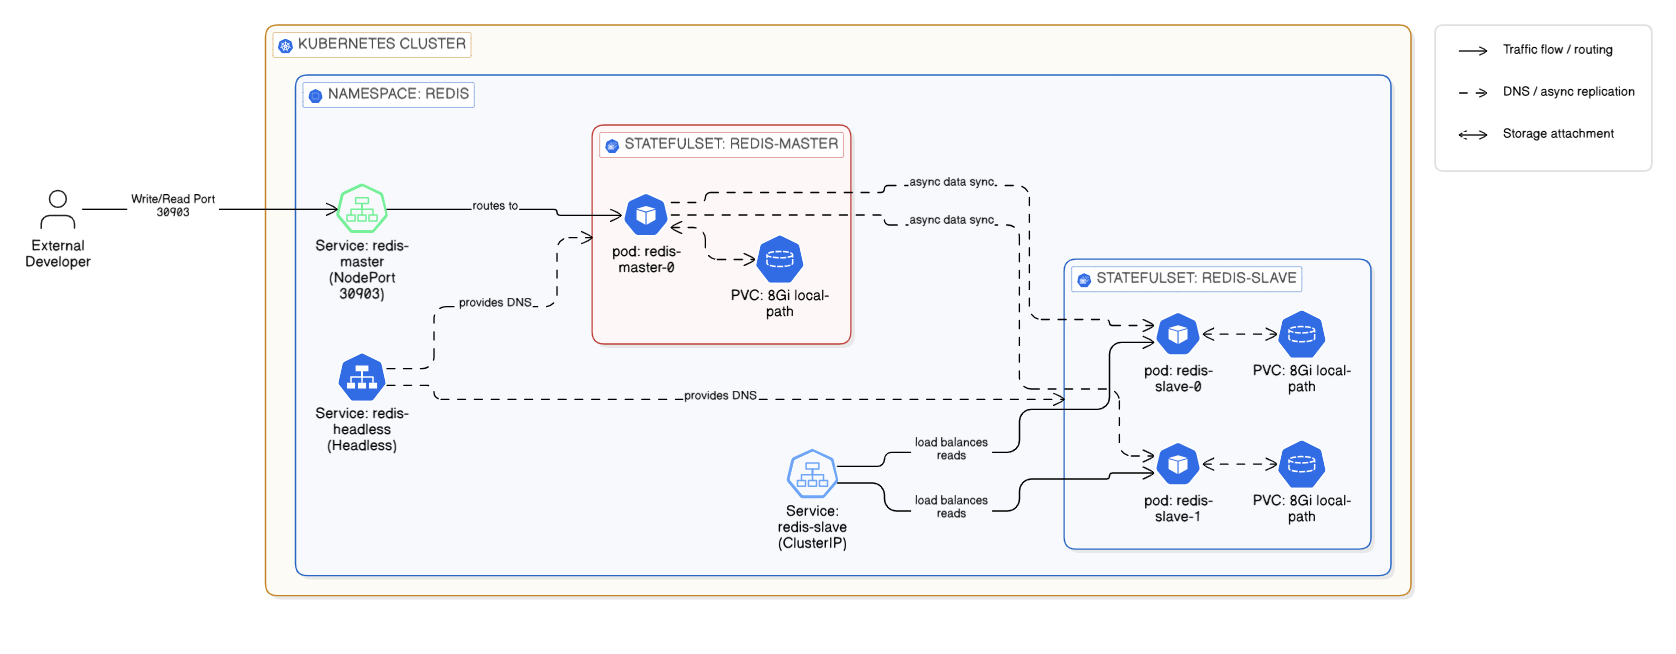
High-Level Architecture of the Redis HA Cluster on Kubernetes
Phase 1: The Architecture & Deployment
To build a true HA database in Kubernetes, you cannot use a standard Deployment. I structured my manifest using industry best practices, relying heavily on StatefulSets.
Here are the core components I engineered for this stack:
1. The Compute Layer (StatefulSets):
I deployed two separate StatefulSets: one for the redis-master (1 replica) and one for the redis-slave (2 replicas). By using StatefulSets, Kubernetes guarantees strict ordering: redis-slave-0 will not boot until redis-master-0 is fully running and ready.
2. The Storage Layer (Dynamic PVCs):
If a Redis pod crashes, we cannot lose the data. Instead of using dangerous manual hostPath volumes, I implemented volumeClaimTemplates linked to our local-path StorageClass. This tells Kubernetes to dynamically provision 8GB Persistent Volumes and tightly bind them to specific pods.
volumeClaimTemplates:
  - metadata:
      name: redis-data
    spec:
      accessModes: ["ReadWriteOnce"]
      storageClassName: "local-path"
      resources:
        requests:
          storage: "8Gi"
3. The Network Identity (Headless Services):
Replicas need to know exactly how to find the Master. I provisioned a Headless Service (ClusterIP: None). This bypasses the standard Kubernetes load balancer and generates a permanent DNS record for the master pod (redis-master-0.redis-headless), ensuring the slaves never lose their connection to the primary database.
The Deployment:
With the architecture codified in a unified YAML manifest, provisioning the entire database infrastructure took a single command:
kubectl apply -f redis-ha-cluster.yaml -n redisPhase 2: The Validation Runbook
In the DevOps world, deploying infrastructure is only 50% of the job. The other 50% is mathematically proving that it works. You cannot just trust that kubectl get pods says Running. You have to dive into the database engine itself.
Here is my 4-step testing runbook to certify a Redis cluster for production.
Test 1: The Replication Status Check
First, we need to ask the Redis Master if it actually sees its worker nodes. I execute directly into the Master pod and query the internal Redis metrics:
kubectl exec -it redis-master-0 -n redis -- redis-cli info replicationWhat I look for:
role:masterconnected_slaves:2(This confirms both replica pods successfully registered with the master).
Next, I reverse the test. I check the Replica pod to ensure it has an active, healthy handshake with the Master:
kubectl exec -it redis-slave-0 -n redis -- redis-cli info replication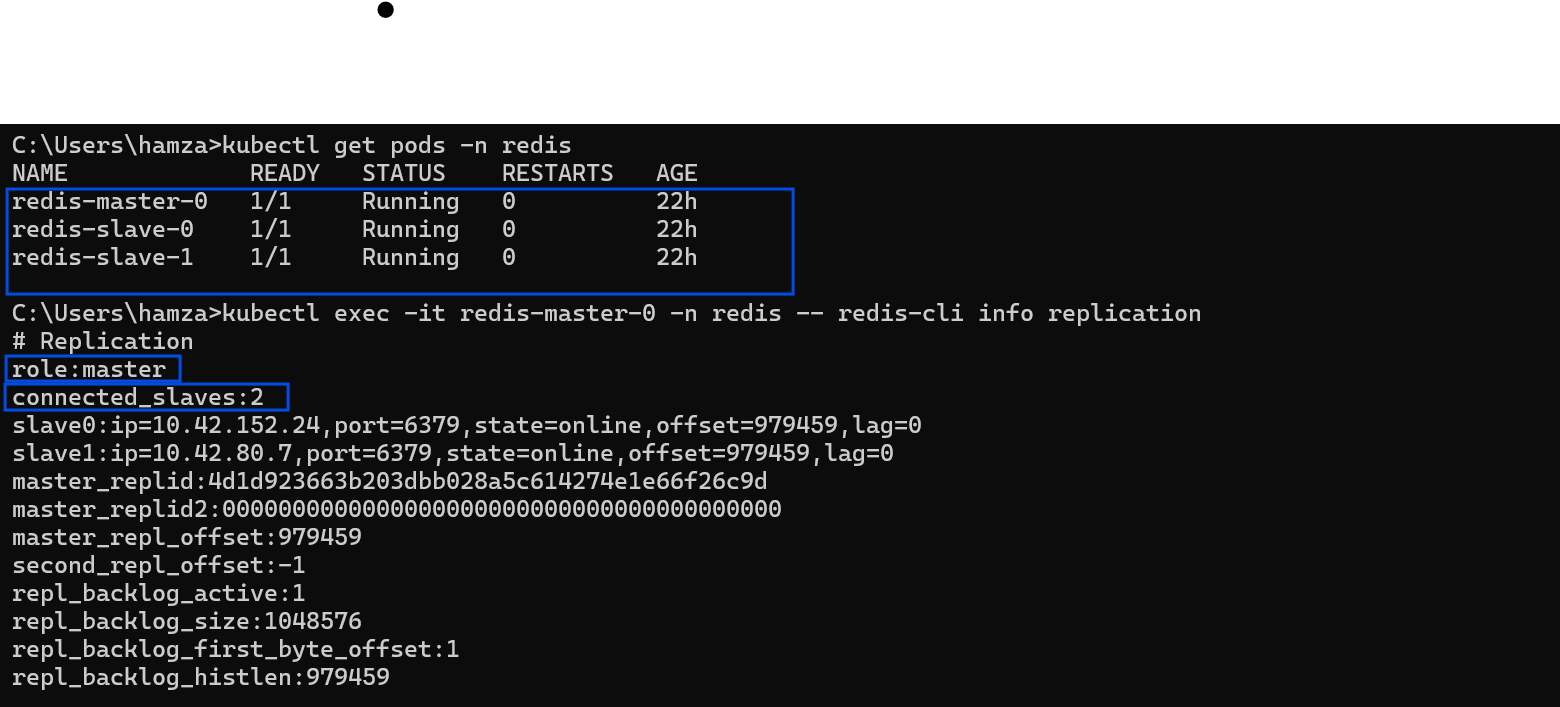
Verifying the Master node's replication statistics and registered slaves.
What I look for:
role:slavemaster_link_status:up(Critical: If this says "down", the pods are running, but the network replication is broken!)

Confirming the Slave node has successfully linked and synced with the Master.
Test 2: The Data Propagation Test (The Ultimate Proof)
Status checks are great, but the ultimate proof of a working cluster is testing the actual data flow. I simulate a backend application by writing data to the Master, and immediately querying the Slave to see if the data replicated across the Kubernetes network.
Step A: Write to the Master
kubectl exec -it redis-master-0 -n redis -- redis-cli set mytest "Hello-Redis"Step B: Read from the Slave
kubectl exec -it redis-slave-0 -n redis -- redis-cli get mytestResult: The slave instantly returns "Hello-Redis". The async replication is working flawlessly.
Test 3: Analyzing the Boot Logs
Even if the cluster is replicating data, there might be hidden warnings (like permission issues or memory fragmentation warnings). I always audit the boot sequence of the Master:
kubectl logs redis-master-0 -n redisWhat I look for:
* Ready to accept connections* Replica redis-slave-0... identity confirmed* Synchronization with replica succeeded
Test 4: The External Network Test (NodePort)
Finally, because my developers need to access this cache from outside the cluster during their local development phase, I exposed the Master via a specific NodePort (30903).
To prove the routing works from an external machine, I ran a ping test from my local Windows terminal directly to the Kubernetes Worker Node IP:
redis-cli -h 192.168.1.81 -p 30903 pingResult: It returns PONG. The Kubernetes Kube-Proxy is successfully routing external TCP traffic directly into the StatefulSet.
Conclusion
By combining Kubernetes StatefulSets with a rigorous testing runbook, you can deploy enterprise-grade databases with absolute confidence.
Never assume an infrastructure deployment is successful just because the pods have a green status. Always verify the application-level logic—check the replication links, test the data propagation, and audit the logs. That is how you build unbreakable platforms.