March 2026 • Infrastructure • 8 min read

Architecting for Infinite Scale: Provisioning AWS EKS with Terraform & Helm

In the DevOps and Platform Engineering world, there is a fundamental distinction between merely deploying an application and building a robust, scalable cloud deployment platform.

Recently, I architected the migration of my personal portfolio application—a standard two-tier architecture featuring a React frontend and a Node.js backend—from a localized bare-metal RKE2 cluster into the cloud utilizing Amazon Elastic Kubernetes Service (EKS).

The objective extended beyond simply running the workloads. The true objective was to engineer an Enterprise-grade Infrastructure-as-Code (IaC) pipeline. While I am deploying only two constituent microservices today, the infrastructure topology I designed is intrinsically capable of horizontally scaling to support 100+ microservices seamlessly, with zero modifications required to the underlying deployment logic.

Below is a comprehensive technical breakdown of how I designed and engineered this cloud-native environment, moving from raw Terraform modules to a declarative Helm rollout.

Architecture Overview of EKS deployment

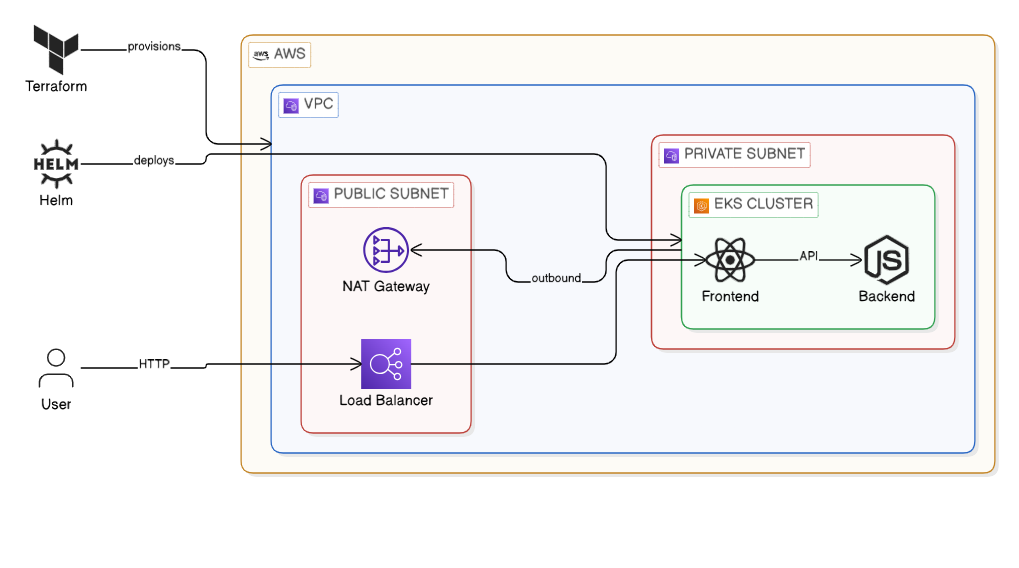
Figure 1: High-level architectural diagram of the EKS Infrastructure layered via Terraform and Helm.

Phase 1: The Infrastructure (Codified with Terraform)

A junior engineer builds infrastructure specifically for the workload immediately in front of them, usually by relying on "ClickOps" in the AWS Management Console. A senior engineer abstracts the infrastructure entirely through standardized code.

To guarantee that this environment remains 100% reproducible and state-managed, I modularized the AWS infrastructure utilizing Terraform. My project structure adopts best-practices for logical separation:

Bash
eks-infrastructure/
├── providers.tf      # AWS provider and Terraform backend config
├── variables.tf      # Dynamic variables for reusability
├── vpc.tf            # The networking layer (Public/Private subnets)     
└── eks.tf            # The Kubernetes Control Plane and Node Groups

1. Variables.tf (Making it Dynamic)

By defining explicit variables, different modular environments (e.g., staging vs. production) can be instantiated instantly.

Terminal
variable "region" {
  description = "AWS Region"
  type        = string
  default     = "eu-west-3"
}

variable "cluster_name" {
  description = "EKS Cluster Name"
  type        = string
  default     = "portfolio-production-cluster"
}

2. vpc.tf (The Network Foundation)

A resilient EKS deployment requires a robust network layer. I provisioned a custom Virtual Private Cloud (VPC) implementing public and private subnets, ensuring that the worker nodes sit securely behind a NAT Gateway—mitigating exposure to the public internet.

Terminal
module "vpc" {
  source  = "terraform-aws-modules/vpc/aws"
  version = "~> 5.0"

  name = "${var.cluster_name}-vpc"
  cidr = "10.0.0.0/16"

  azs             = ["${var.region}a", "${var.region}b"]
  private_subnets = ["10.0.1.0/24", "10.0.2.0/24"]
  public_subnets  = ["10.0.101.0/24", "10.0.102.0/24"]

  enable_nat_gateway   = true
  single_nat_gateway   = true
  enable_dns_hostnames = true
}

3. eks.tf (The Compute Layer)

Compute cost is the primary bottleneck for cloud projects. I leveraged AWS Spot Instances for the underlying worker nodes to drastically slash compute costs without sacrificing application performance or reliability.

Terminal
module "eks" {
  source  = "terraform-aws-modules/eks/aws"
  version = "~> 20.0"

  cluster_name    = var.cluster_name
  cluster_version = "1.30"

  vpc_id     = module.vpc.vpc_id
  subnet_ids = module.vpc.private_subnets
  cluster_endpoint_public_access = true

  eks_managed_node_groups = {
    standard_workers = {
      min_size     = 1
      max_size     = 3
      desired_size = 2

      instance_types = ["t3.medium"]
      capacity_type  = "SPOT" # FinOps: Crucial cost optimization strategy!
    }
  }
}

Phase 2: Provisioning the Cluster

With infrastructure treated purely as software, orchestrating the entire AWS footprint requires merely three standard operations.

Bash
# Initialize Terraform backend and download AWS Provider modules
terraform init

# Review the deterministic execution plan
terraform plan

# Provision the VPC, NAT Gateways, and EKS Control Plane mapping
terraform apply --auto-approve

Once Terraform execution concludes successfully (typically around 15 minutes for the EKS Control Plane), I dynamically update my local configuration to context switch into the newly provisioned Cloud cluster:

Terminal
aws eks update-kubeconfig --region eu-west-3 --name portfolio-production-cluster

Phase 3: The Cloud Networking Gotcha & Helm Deployment

With the physical and virtual control plane online, workload deployment commenced utilizing a Helm Umbrella Chart.

However, migrating to an AWS-backed cloud environment introduced a specific networking challenge. Locally within RKE2, I resolved ingress traffic by setting my service type to NodePort. In AWS, traffic hitting random high-numbered NodePorts is automatically dropped by default EC2 Security Groups.

The elegant cloud-native solution involved a simple declarative modification to my values.yaml, specifically requesting an integrated cloud Load Balancer instead constraints:

Terminal
# values.yaml
frontend:
  service:
    type: LoadBalancer
    port: 80

Following this single architectural modification, the unified frontend and backend deployment rolled out instantly:

Bash
helm install portfolio-app ./helm-portfolio-chart -n production --create-namespace

The native AWS Cloud Controller seamlessly intercepts the LoadBalancer specification and automatically provisions a physical AWS Classic Load Balancer (ELB), mapping network traffic natively down into the appropriate Kubernetes pod ingress paths.

Results & Validation

The culmination of this IaC process presents a pristine, operational cloud architecture accessible to the public web.

Terraform Apply Screen

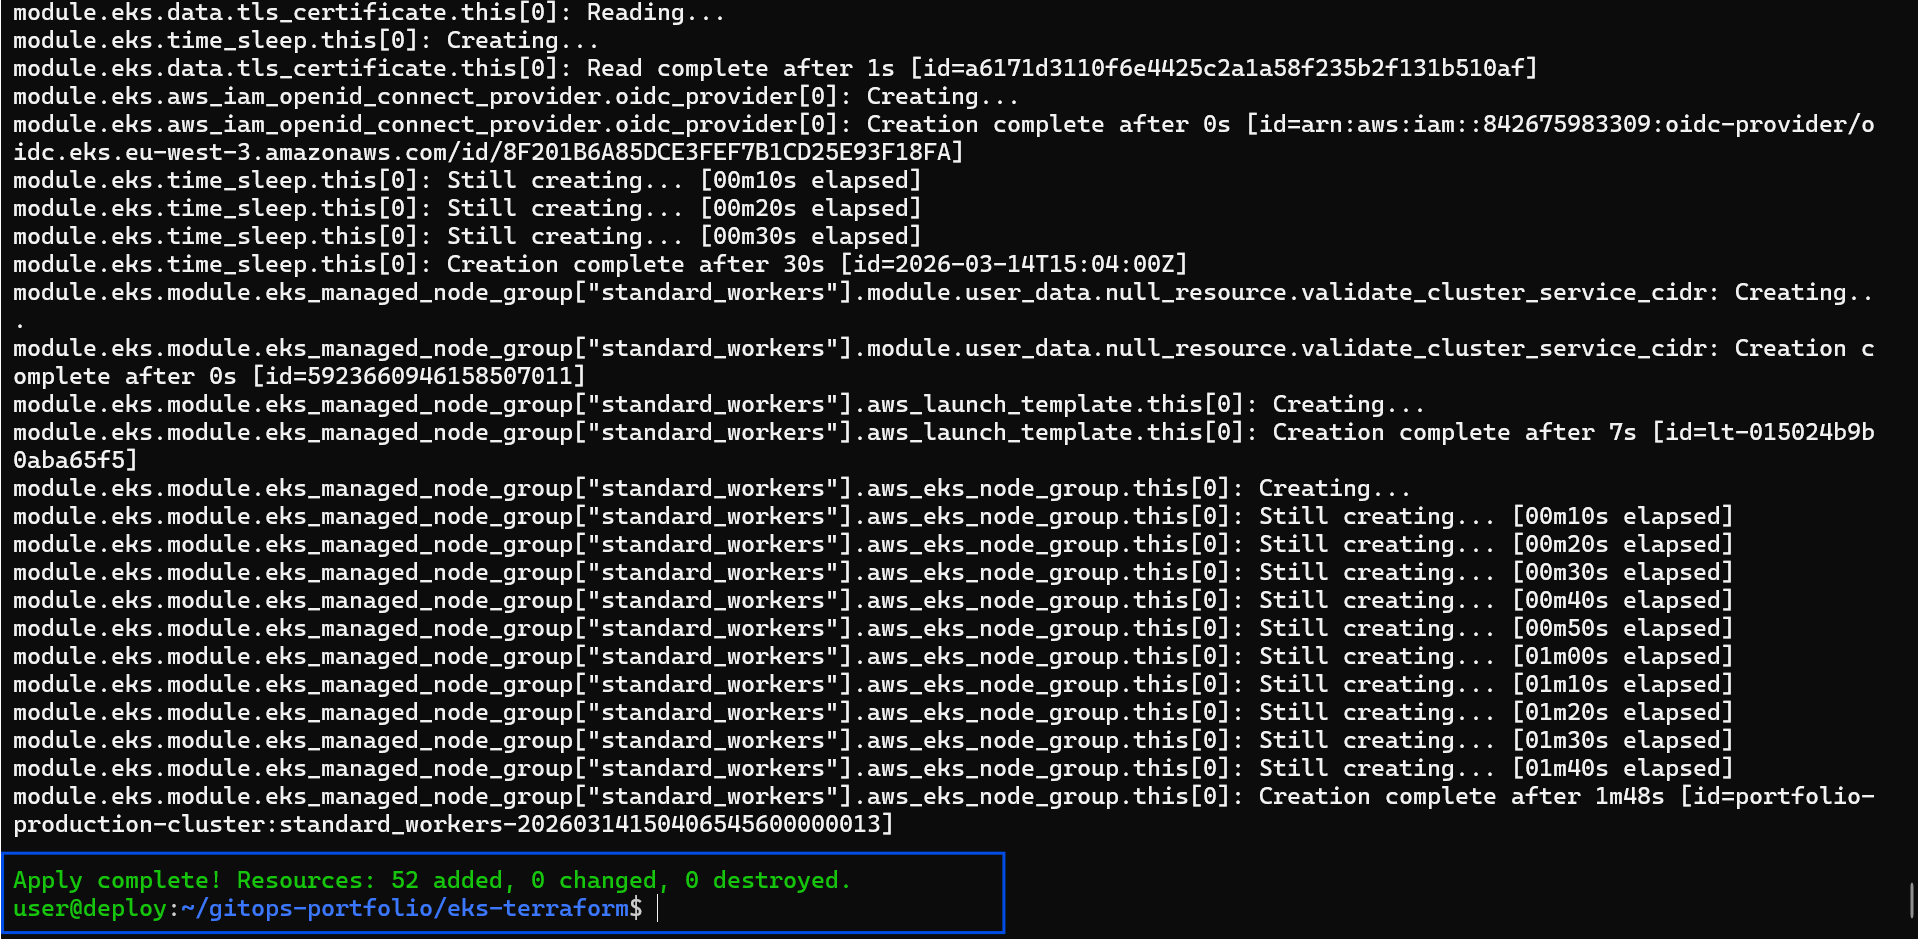
📸 Caption: Terraform successfully provisioning the AWS VPC, strict IAM boundaries, and the EKS Control Plane in a single automated workflow.

Kubernetes Pods and Services Output

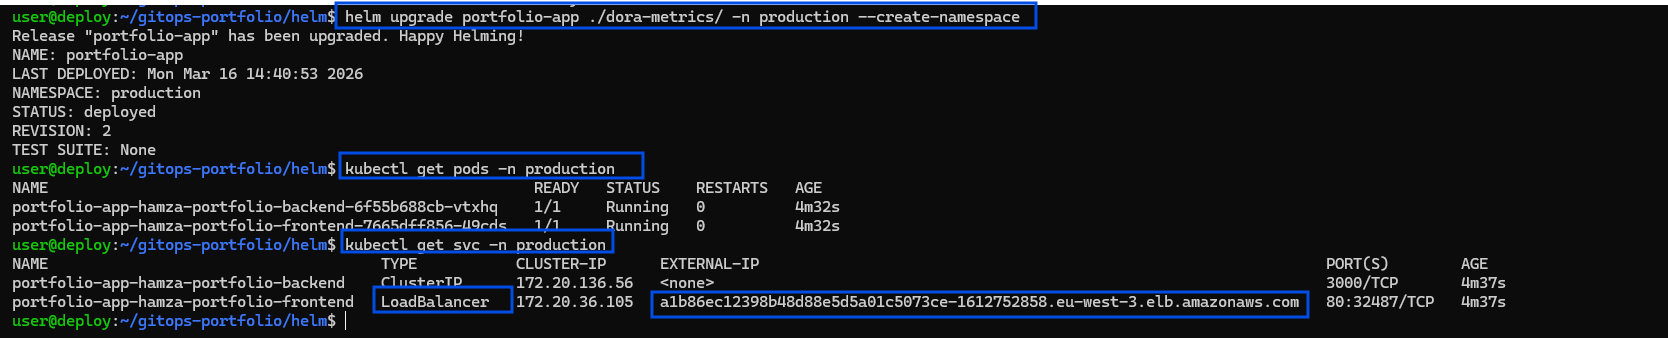
📸 Caption: Validating the deployment via `kubectl get pods,svc -n production`. Notice the generic LoadBalancer service autonomously assigning a public-facing AWS DNS endpoint for the portfolio site.

Kubernetes Pods Output from console AWS

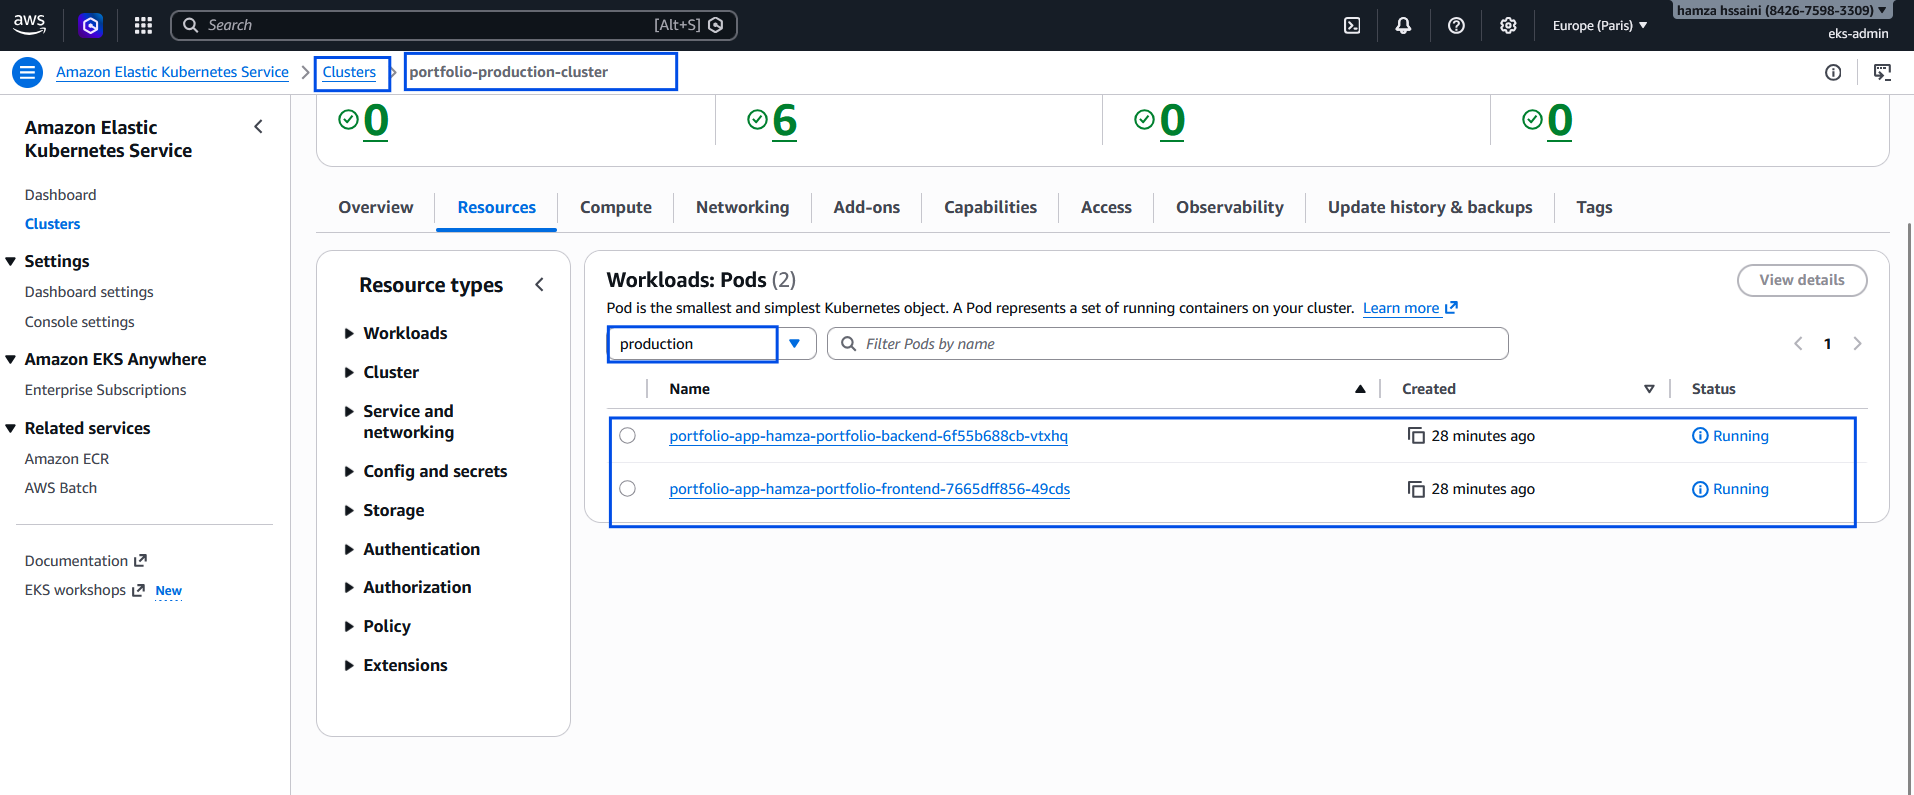
📸 Caption: Validating the deployment via via CONSOLE AWS, -n production`

App live in the Browser

📸 Caption: Success! The portfolio frontend communicating reliably with the Node.js backend entirely over the public internet through the newly provisioned AWS ELB.

Troubleshooting AWS Guardrails & Security Traps

Enterprise cloud deployments rarely survive first contact with the cloud provider's API without hitting security or quota guardrails. During this migration, I encountered and resolved several advanced AWS and Kubernetes roadblocks. Documenting these challenges highlights the realities of transitioning from bare-metal orchestration to managed cloud environments.

1. Bypassing Cloud Sandbox Quotas (EC2 FinOps)

The Challenge: During the initial terraform apply, the EKS Managed Node Group creation failed with an AsgInstanceLaunchFailures error, stating the instance type was not eligible for the Free Tier. Because I was operating within a strict AWS promotional credit sandbox, AWS instituted hard guardrails against provisioning standard t3.medium compute nodes.

The Fix: Instead of blindly guessing allowed instance types, I queried the AWS API directly using the CLI to discover exactly what the sandbox would allow:

Terminal
aws ec2 describe-instance-types --filters "Name=free-tier-eligible,Values=true" --query "InstanceTypes[*].InstanceType" --region eu-west-3
Terminal showing the aws ec2 describe-instance-types command

Figure 4: Querying the AWS EC2 API to dynamically discover Free-Tier eligible architectures in the eu-west-3 region to bypass Sandbox quotas.

This revealed that t3.small (2GB RAM) was permitted. I dynamically updated my Terraform variables to inject t3.small into the ASG (Auto Scaling Group) launch template, successfully bypassing the sandbox quota while securing enough memory to avoid OOMKilled errors for my system pods.

2. AuthN: The "Provide Credentials" Trap

The Challenge: After successfully provisioning the cluster and updating my local kubeconfig to use my eks-admin profile, my kubectl client aggressively rejected my connection:

Bash
user@deploy:~/gitops-portfolio/eks-terraform$ kubectl get nodes
E0316 13:47:03.803824 memcache.go:265] "Unhandled Error" err="couldn't get current server API group list: the server has asked for the client to provide credentials"
error: You must be logged in to the server (the server has asked for the client to provide credentials)

The Root Cause & Fix: This is a classic Authentication (AuthN) failure. Even though my AWS CLI was generating valid STS tokens locally, the modern EKS Control Plane uses a strict Access Entries system. Because my eks-admin IAM user was not officially registered inside the EKS cluster's identity map, Kubernetes simply refused to acknowledge the token.

Terminal showing the provide credentials error

Figure 5: Diagnosing the 401 Unauthorized API error. The EKS Control Plane was rejecting the AWS STS token because the IAM Principal was not mapped.

I resolved this by navigating to the AWS EKS Console and explicitly creating a new Access Entry for my arn:aws:iam::842675983309:user/eks-admin principal, officially bridging my AWS identity with the Kubernetes API.

3. AuthZ: The 403 Forbidden RBAC Error

The Challenge: Immediately after fixing the credentials issue, I ran kubectl get nodes again and hit the next layer of security:

Terminal
Error from server (Forbidden): nodes is forbidden: User "arn:aws:iam::842675983309:user/eks-admin" cannot list resource "nodes" in API group "" at the cluster scope

The Senior Fix: This is a textbook Authorization (AuthZ) error. EKS now recognized who I was (Authentication), but I had zero permissions inside the cluster (Authorization). Creating an Access Entry is not enough; it must be bound to a strict Role-Based Access Control (RBAC) policy.

Terminal showing the Forbidden: nodes is forbidden error

Figure 6: The AuthZ roadblock. The cluster successfully authenticated the user, but strict RBAC rules prevented resource discovery.

To fix this, I attached the AmazonEKSClusterAdminPolicy directly to my Access Entry within the AWS GUI at the cluster scope. Instantly, my eks-admin user was granted full cluster orchestration rights, and the worker nodes appeared in my terminal.

4. Zero-Trust Identity Mismatch (CLI vs. GUI)

The Challenge: While I could now successfully orchestrate my pods via the CLI, logging into the AWS EKS Web Console displayed: "This cluster does not have any Pods, or you don't have permission to view them."

The Fix: This perfectly illustrates the disconnect between terminal sessions and browser sessions. My Linux terminal was authenticated via the eks-admin IAM Access Keys, but my web browser was still authenticated as the AWS Root user.

The AWS Web Console showing the 'This cluster does not have any pods...' warning

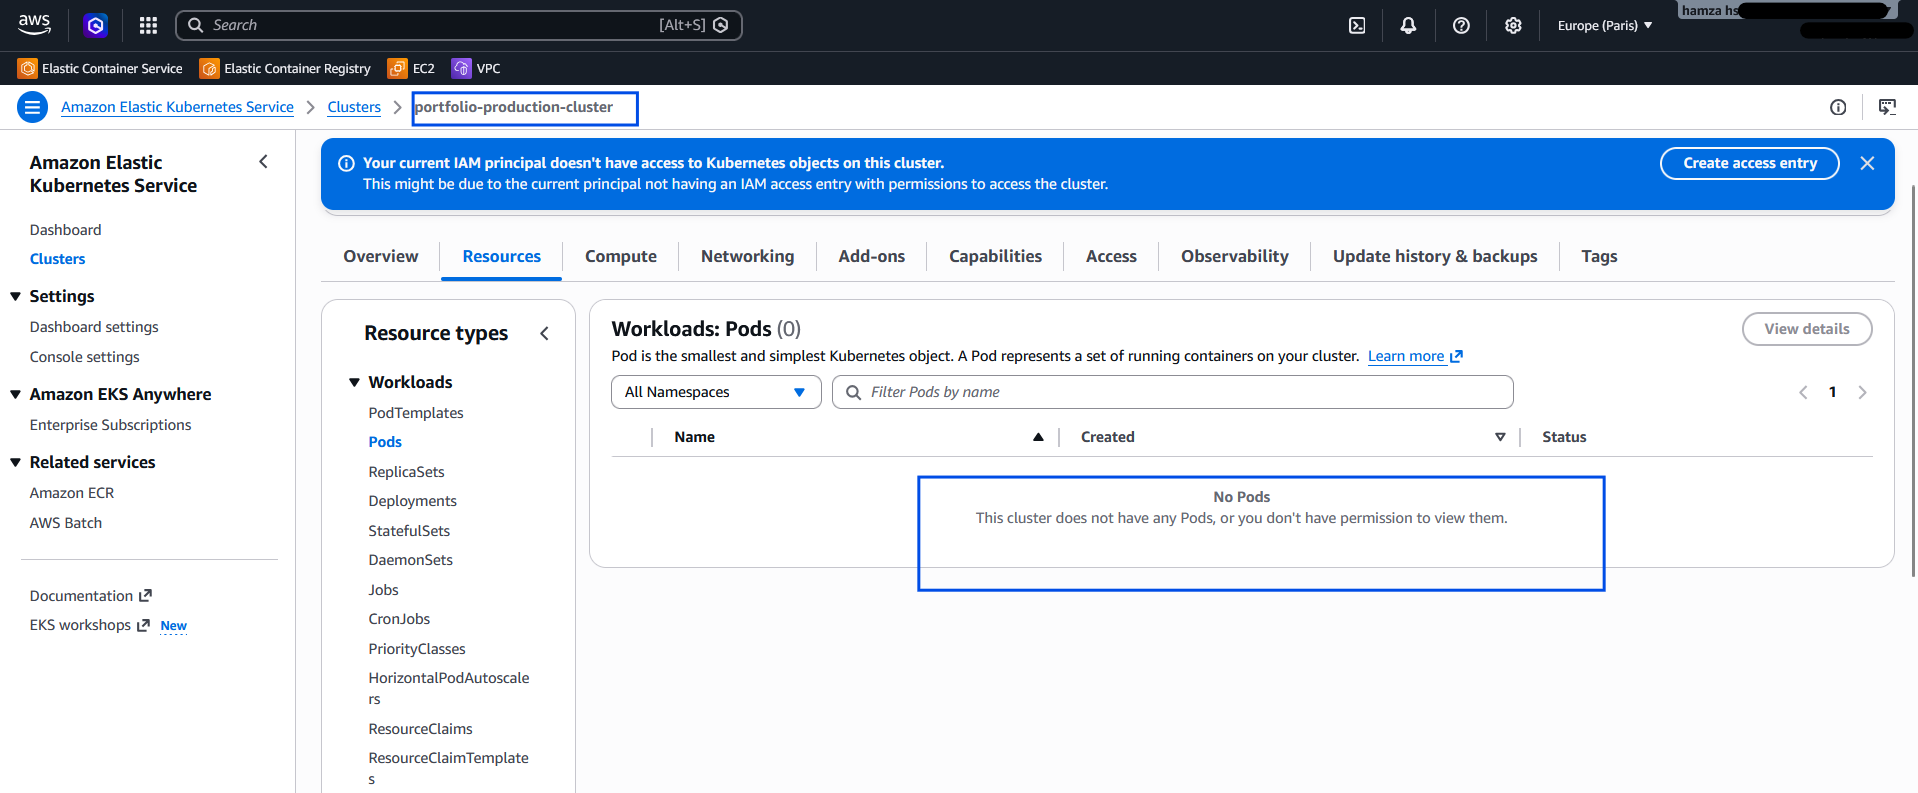
Figure 7: Resolving the CLI vs. GUI mismatch. The AWS Console correctly hid the workloads from the unauthorized Root session, enforcing true Zero-Trust architecture.

Because I strictly isolated my Kubernetes RBAC bindings to the eks-admin identity, the AWS Console correctly hid the workloads from the unauthorized Root session. By generating a console password for eks-admin and switching browser sessions, I aligned my GUI identity with my CLI identity, successfully visualizing my workloads.

5. Asynchronous Cloud Networking (The DNS Delay)

The Challenge: Upon deploying my Helm Umbrella chart, AWS successfully provisioned a Classic Load Balancer (ELB). However, accessing the provided .elb.amazonaws.com endpoint immediately resulted in a DNS_PROBE_POSSIBLE browser error.

The Fix: In localized environments, NodePorts bind instantly. In the cloud, infrastructure is asynchronous. This error simply indicated that AWS Route53 required 3 to 5 minutes to propagate the newly generated A-Records across global DNS resolvers. Understanding this cloud timing mechanism prevented unnecessary debugging; after a brief propagation window, the application resolved perfectly over the public internet.

The browser showing the DNS_PROBE_POSSIBLE browser error

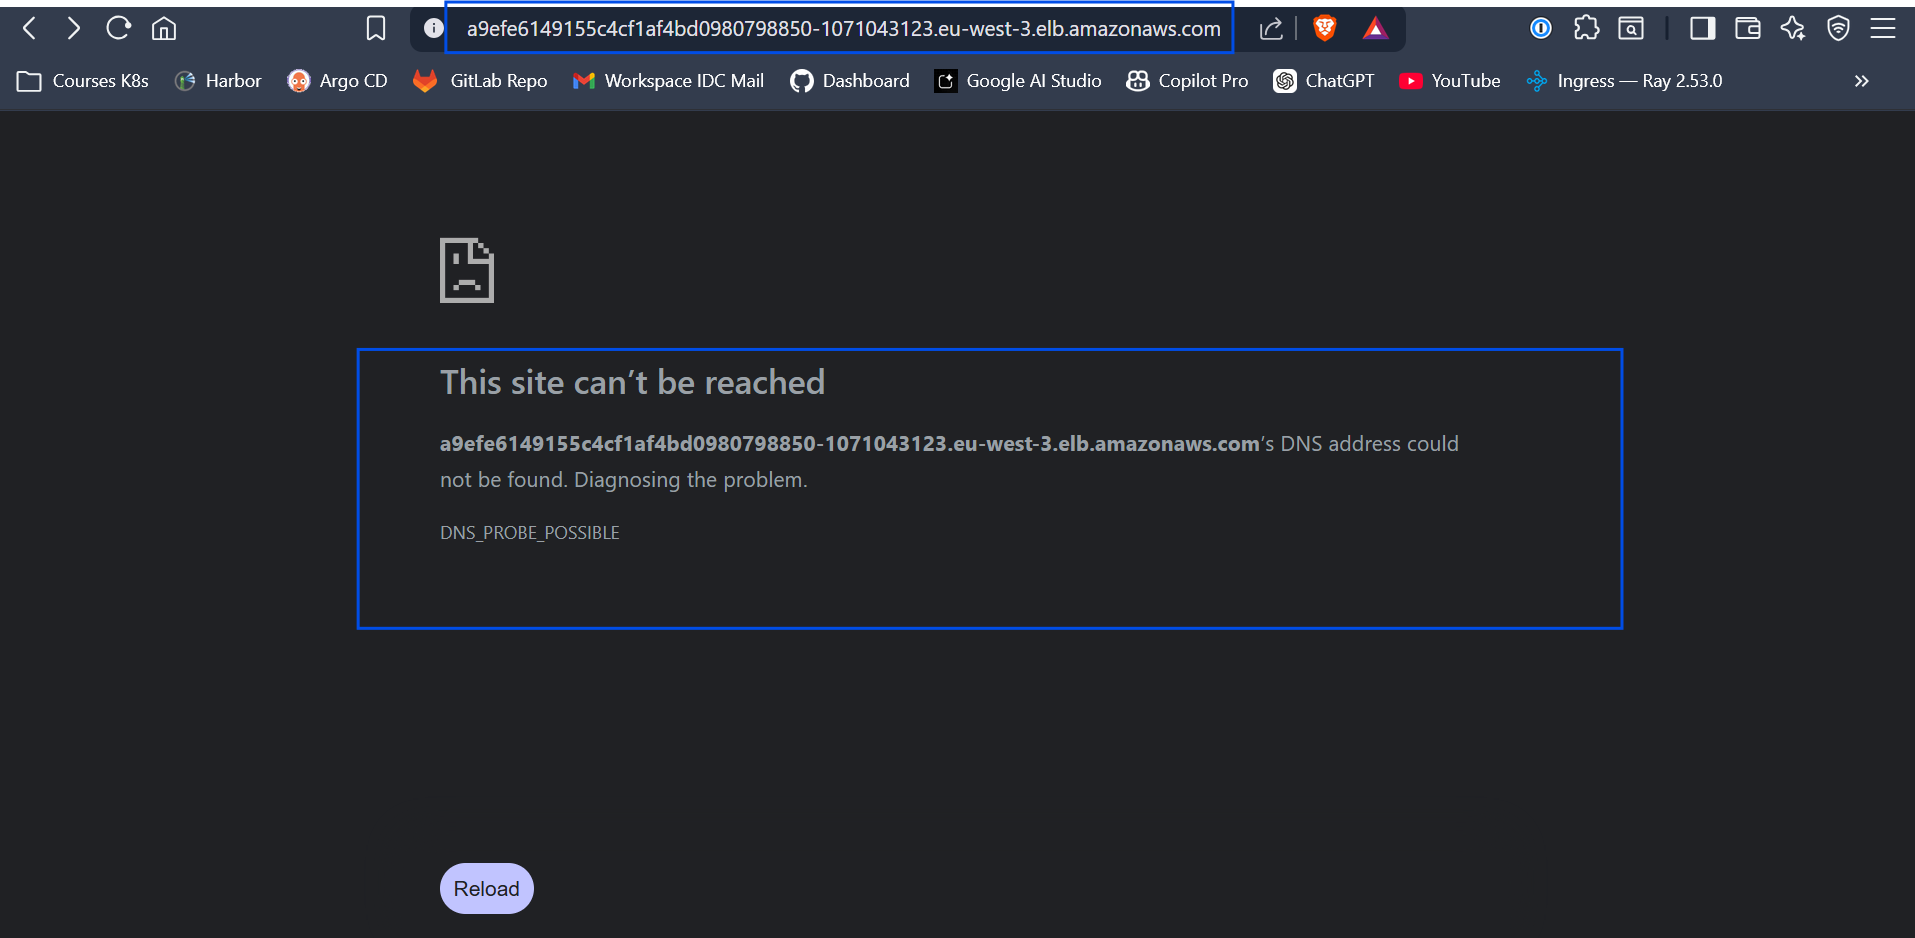
Figure 8: The browser showing the DNS_PROBE_POSSIBLE browser error.

FinOps & Cost Management: Embracing Ephemeral Infrastructure

Managed cloud environments possess immense capabilities, but they inherently carry substantial billing implications. The managed EKS Control Plane independently incurs roughly $73/month. Because I am currently operating on a strict $53 AWS promotional credit margin, leaving this cluster perpetually running would completely drain my budget within weeks.

This highlights the ultimate leverage of strict Infrastructure as Code. Because my entire environment is thoroughly codified and stateless, my cluster itself can act as ephemeral infrastructure. At the end of my technical sessions, I reduce my daily AWS burn rate back down to strictly $0.00 by executing:

Bash
terraform destroy --auto-approve
Terminal showing terraform destroy output

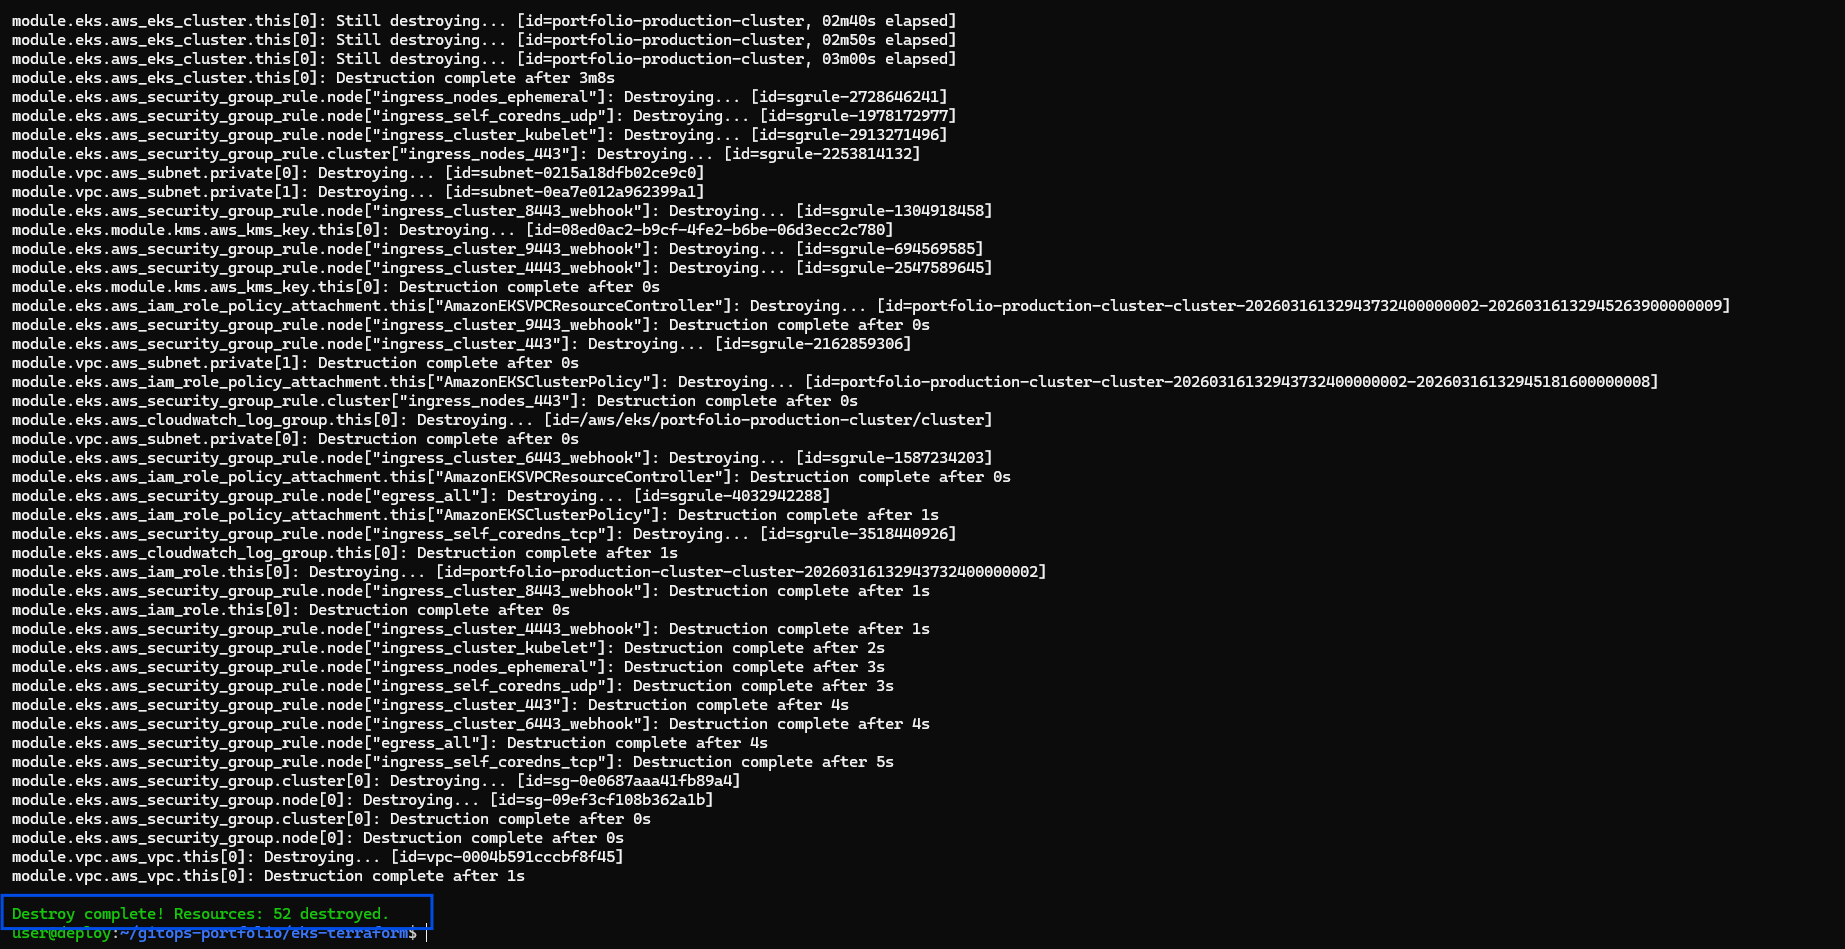
Executing infrastructure tear-down to maintain zero AWS spend during inactive hours.

The following morning? A single terraform apply and one sequential helm install later, and my fully resilient, production-grade EKS cloud layout is entirely rebuilt from absolute scratch and resolving traffic.

Conclusion

Migrating my workloads from on-premise localized orchestration into AWS EKS proves definitively that Kubernetes remains the ultimate computing equalizer. By layering Terraform for rock-solid deterministic infrastructure and Helm for agile application delivery, I successfully built a platform-agnostic enterprise pipeline.

Whether I am deploying a rudimentary two-tier portfolio architecture or maintaining a massive 100-service AI processing platform, the fundamental pipeline remains utterly identical, aggressively automated, and infinitely scalable.

Mars 2026 • Infrastructure • 8 min de lecture

Architecturer pour une Échelle Infinie : Provisionnement d'AWS EKS avec Terraform & Helm

Dans le monde du DevOps et de l'ingénierie de plateforme, il existe une distinction fondamentale entre le simple déploiement d'une application et la création d'une plateforme de déploiement cloud robuste et évolutive.

Récemment, j'ai architecturé la migration de mon application de portfolio personnelle — une architecture standard à deux niveaux comprenant un frontend React et un backend Node.js — d'un cluster RKE2 localisé sur serveur nu vers le cloud, en utilisant Amazon Elastic Kubernetes Service (EKS).

L'objectif allait au-delà de la simple exécution des charges de travail. Le véritable but était de concevoir un pipeline d'Infrastructure en tant que Code (IaC) de niveau entreprise. Bien que je ne déploie aujourd'hui que deux microservices constitutifs, la topologie d'infrastructure que j'ai conçue est intrinsèquement capable de s'adapter horizontalement pour supporter plus de 100 microservices de manière transparente, sans aucune modification requise pour la logique de déploiement sous-jacente.

Vous trouverez ci-dessous une analyse technique exhaustive de la manière dont j'ai conçu et réalisé cet environnement cloud natif, depuis les modules Terraform bruts jusqu'au déploiement déclaratif avec Helm.

Aperçu de l'Architecture du déploiement EKS

Figure 1: Schéma architectural de haut niveau de l'infrastructure EKS structurée via Terraform et Helm.

Phase 1: L'Infrastructure (Codifiée avec Terraform)

Un ingénieur junior construit une infrastructure spécifiquement pour la charge de travail se trouvant immédiatement devant lui, s'appuyant souvent sur le "ClickOps" dans la console de gestion AWS. Un ingénieur senior abstrait entièrement l'infrastructure grâce à du code standardisé.

Afin de garantir que cet environnement reste 100 % reproductible et géré par état, j'ai modularisé l'infrastructure AWS à l'aide de Terraform. La structure de mon projet adopte les meilleures pratiques en matière de séparation logique :

Terminal
eks-infrastructure/
├── providers.tf      # Configuration du fournisseur AWS et du backend Terraform
├── variables.tf      # Variables dynamiques pour la réutilisabilité
├── vpc.tf            # La couche réseau (sous-réseaux Publics/Privés)     
└── eks.tf            # Le Plan de Contrôle Kubernetes et les Groupes de Nœuds

1. Variables.tf (Le rendre Dynamique)

En définissant des variables explicites, différents environnements modulaires (par ex., pré-production vs. production) peuvent être instanciés instantanément.

Terminal
variable "region" {
  description = "Région AWS"
  type        = string
  default     = "eu-west-3"
}

variable "cluster_name" {
  description = "Nom du Cluster EKS"
  type        = string
  default     = "portfolio-production-cluster"
}

2. vpc.tf (La Fondation Réseau)

Un déploiement EKS résilient nécessite une couche réseau solide. J'ai provisionné un Réseau Privé Virtuel (VPC) personnalisé implémentant des sous-réseaux publics et privés, garantissant que les nœuds de travail se trouvent en toute sécurité derrière une passerelle NAT — limitant ainsi l'exposition à l'internet public.

Terminal
module "vpc" {
  source  = "terraform-aws-modules/vpc/aws"
  version = "~> 5.0"

  name = "${var.cluster_name}-vpc"
  cidr = "10.0.0.0/16"

  azs             = ["${var.region}a", "${var.region}b"]
  private_subnets = ["10.0.1.0/24", "10.0.2.0/24"]
  public_subnets  = ["10.0.101.0/24", "10.0.102.0/24"]

  enable_nat_gateway   = true
  single_nat_gateway   = true
  enable_dns_hostnames = true
}

3. eks.tf (La Couche de Calcul)

Le coût du calcul est le principal goulot d'étranglement des projets cloud. J'ai utilisé des Instances Spot AWS pour les nœuds de travail sous-jacents afin de réduire considérablement les coûts de calcul sans sacrifier les performances ou la fiabilité de l'application.

Terminal
module "eks" {
  source  = "terraform-aws-modules/eks/aws"
  version = "~> 20.0"

  cluster_name    = var.cluster_name
  cluster_version = "1.30"

  vpc_id     = module.vpc.vpc_id
  subnet_ids = module.vpc.private_subnets
  cluster_endpoint_public_access = true

  eks_managed_node_groups = {
    standard_workers = {
      min_size     = 1
      max_size     = 3
      desired_size = 2

      instance_types = ["t3.medium"]
      capacity_type  = "SPOT" # FinOps: Stratégie d'optimisation des coûts cruciale !
    }
  }
}

Phase 2: Provisionnement du Cluster

L'infrastructure étant traitée purement comme du logiciel, l'orchestration de l'ensemble de l'empreinte AWS ne requiert que trois opérations standard.

Bash
# Initialiser le backend Terraform et télécharger les modules du Fournisseur AWS
terraform init

# Examiner le plan d'exécution déterministe
terraform plan

# Provisionner le VPC, les Passerelles NAT et le mapping du Plan de Contrôle EKS
terraform apply --auto-approve

Une fois l'exécution de Terraform terminée avec succès (généralement environ 15 minutes pour le plan de contrôle EKS), je mets dynamiquement à jour ma configuration locale pour basculer vers le nouveau cluster Cloud :

Terminal
aws eks update-kubeconfig --region eu-west-3 --name portfolio-production-cluster

Phase 3: Le Piège du Réseau Cloud & Déploiement Helm

Le plan de contrôle physique et virtuel étant en ligne, le déploiement des charges de travail a commencé à l'aide d'un Helm Umbrella Chart.

Cependant, la migration vers un environnement cloud basé sur AWS a introduit un défi de réseau spécifique. Localement au sein de RKE2, je gérais le trafic d'entrée en définissant mon type de service sur NodePort. Dans AWS, le trafic arrivant sur des NodePorts élevés aléatoires est automatiquement rejeté par les groupes de sécurité EC2 par défaut.

La solution élégante Cloud-native consistait en une simple modification déclarative de mon values.yaml, demandant spécifiquement un équilibreur de charge cloud intégré au lieu des contraintes précédentes :

Terminal
# values.yaml
frontend:
  service:
    type: LoadBalancer
    port: 80

À la suite de cette unique modification architecturale, le déploiement unifié du frontend et du backend s'est déroulé instantanément :

Bash
helm install portfolio-app ./helm-portfolio-chart -n production --create-namespace

Le contrôleur natif d'AWS détecte de manière transparente la spécification LoadBalancer et provisionne automatiquement un physique AWS Classic Load Balancer (ELB), acheminant naturellement le trafic réseau vers les chemins d'entrée des pods Kubernetes appropriés.

Résultats & Validation

L'aboutissement de ce processus IaC présente une architecture cloud impeccable et opérationnelle, accessible sur le web.

Écran Terraform Apply

Terraform provisionnant avec succès le VPC AWS, les limites IAM strictes, et le Plan de Contrôle EKS en un seul flux de travail automatisé.

Sortie des Pods et Services Kubernetes

Validation du déploiement via `kubectl get pods,svc -n production`. Remarquez le service générique LoadBalancer attribuant de manière autonome un point de terminaison DNS AWS public pour le site du portfolio.

Application en direct dans le navigateur

Succès ! Le frontend du portfolio communiquant de manière fiable avec le backend Node.js, entièrement via l'internet public au travers du nouvel ELB AWS.

Notes de Tranchée : Résolution des Problèmes liés aux Garde-fous et Pièges de Sécurité AWS

Les déploiements cloud en entreprise survivent rarement au premier contact avec l'API du fournisseur cloud sans se heurter à des limites de sécurité ou de quotas. Lors de cette migration, j'ai rencontré et résolu plusieurs obstacles avancés liés à AWS et Kubernetes. Documenter ces défis met en évidence les réalités de la transition d'une orchestration bare-metal vers des environnements cloud managés.

1. Contourner les Quotas des Sandboxes Cloud (FinOps EC2)

Le Défi : Lors de l'exécution initiale du terraform apply, la création du Groupe de Nœuds Managés EKS a échoué avec une erreur AsgInstanceLaunchFailures, indiquant que le type d'instance n'était pas éligible pour l'Offre Gratuite (Free Tier). Comme j'opérais dans le cadre strict d'un crédit promotionnel AWS (sandbox), AWS imposait des garde-fous stricts contre le provisionnement de nœuds standard t3.medium.

La Solution : Au lieu de deviner aveuglément les types d'instances autorisés, j'ai directement interrogé l'API AWS en utilisant la CLI pour découvrir exactement ce que la sandbox permettait :

Terminal
aws ec2 describe-instance-types --filters "Name=free-tier-eligible,Values=true" --query "InstanceTypes[*].InstanceType" --region eu-west-3
Terminal affichant la commande aws ec2 describe-instance-types

Figure 4 : Interrogation de l'API AWS EC2 pour découvrir dynamiquement les architectures éligibles à l'Option Gratuite dans la région eu-west-3 afin de contourner les quotas de la Sandbox.

Cela a révélé que les t3.small (2 Go de RAM) étaient autorisées. J'ai mis à jour dynamiquement mes variables Terraform pour injecter t3.small dans le modèle de lancement de l'ASG, réussissant ainsi à contourner le quota de la sandbox tout en sécurisant suffisamment de mémoire pour éviter les erreurs OOMKilled pour mes pods système.

2. AuthN : Le Piège du "Provide Credentials"

Le Défi : Après avoir provisionné le cluster avec succès et mis à jour mon kubeconfig local pour utiliser mon profil eks-admin, mon client kubectl a catégoriquement rejeté ma connexion :

Bash
user@deploy:~/gitops-portfolio/eks-terraform$ kubectl get nodes
E0316 13:47:03.803824 memcache.go:265] "Unhandled Error" err="couldn't get current server API group list: the server has asked for the client to provide credentials"
error: You must be logged in to the server (the server has asked for the client to provide credentials)

La Cause Racine & La Solution : Il s'agit d'un échec classique d'Authentification (AuthN). Bien que ma CLI AWS générait des jetons STS valides localement, le Plan de Contrôle (Control Plane) moderne d'EKS utilise un système strict d'Access Entries. Étant donné que mon utilisateur IAM eks-admin n'était pas officiellement enregistré dans la carte d'identités du cluster EKS, Kubernetes refusait tout simplement de reconnaître le jeton.

Terminal affichant l'erreur de fourniture de credentials

Figure 5 : Diagnostic de l'erreur API 401 Unauthorized. Le Plan de Contrôle EKS rejetait le jeton STS AWS car le Principal IAM n'était pas mappé.

J'ai résolu cela en naviguant dans la Console AWS EKS et en créant explicitement une nouvelle Access Entry pour mon principal arn:aws:iam::842675983309:user/eks-admin, établissant ainsi officiellement un pont entre mon identité AWS et l'API Kubernetes.

3. AuthZ : L'Erreur RBAC 403 Forbidden

Le Défi : Immédiatement après avoir résolu le problème d'identifiants, j'ai relancé kubectl get nodes et me suis heurté à la couche de sécurité suivante :

Terminal
Error from server (Forbidden): nodes is forbidden: User "arn:aws:iam::842675983309:user/eks-admin" cannot list resource "nodes" in API group "" at the cluster scope

La Solution Expert : C'est une erreur d'Autorisation (AuthZ) d'école. EKS reconnaissait désormais qui j'étais (Authentification), mais je n'avais aucune permission à l'intérieur du cluster (Autorisation). Créer une Access Entry n'est pas suffisant ; elle doit être liée à une politique stricte de contrôle d'accès basé sur les rôles (RBAC).

Terminal affichant l'erreur Forbidden

Figure 6 : Le blocage AuthZ. Le cluster a authentifié l'utilisateur avec succès, mais les règles RBAC strictes empêchaient la découverte des ressources.

Pour corriger cela, j'ai attaché la politique AmazonEKSClusterAdminPolicy directement à mon Access Entry depuis l'interface AWS avec une portée au niveau du cluster. Instantanément, mon utilisateur eks-admin s'est vu accorder les pleins droits d'orchestration sur le cluster, et les worker nodes sont apparus dans mon terminal.

4. Incohérence d'Identité Zero-Trust (CLI vs. Interface Web)

Le Défi : Alors que je pouvais désormais orchestrer mes pods avec succès via la CLI, la connexion à la Console Web AWS EKS affichait : "Ce cluster ne contient aucun Pod, ou vous n'avez pas l'autorisation de les voir."

La Solution : Ceci illustre parfaitement la déconnexion entre les sessions du terminal et celles du navigateur. Mon terminal Linux était authentifié via les Access Keys IAM de eks-admin, mais mon navigateur web était toujours authentifié en tant qu'utilisateur Root AWS.

Interface AWS affichant l'avertissement 'Ce cluster ne contient aucun Pod...'

Figure 7 : Résolution de l'incohérence CLI vs Interface Web. La Console AWS masquait correctement les charges de travail à la session Root non autorisée, appliquant ainsi une véritable architecture Zero-Trust.

Puisque j'avais strictement isolé mes liaisons RBAC Kubernetes à l'identité eks-admin, la Console AWS masquait correctement les charges de travail à la session Root non autorisée. En générant un mot de passe console pour eks-admin et en changeant de session sur mon navigateur, j'ai aligné mon identité d'interface web avec mon identité CLI, réussissant ainsi à visualiser mes charges de travail.

5. Réseau Cloud Asynchrone (Le Délai DNS)

Le Défi : Lors du déploiement de mon chart Helm Umbrella, AWS a provisionné avec succès un Classic Load Balancer (ELB). Cependant, l'accès au point de terminaison .elb.amazonaws.com fourni entraînait immédiatement une erreur navigateur DNS_PROBE_POSSIBLE.

La Solution : Dans des environnements locaux, les NodePorts s'attachent instantanément. Dans le cloud, l'infrastructure est asynchrone. Cette erreur indiquait simplement qu'AWS Route53 nécessitait 3 à 5 minutes pour propager les nouveaux enregistrements A générés à travers les résolveurs DNS mondiaux. Comprendre ce mécanisme de temporisation cloud a évité un débogage inutile ; après une brève fenêtre de propagation, l'application se résolvait parfaitement sur l'internet public.

Le navigateur affichant l'erreur DNS_PROBE_POSSIBLE

Figure 8 : Le navigateur affichant l'erreur DNS_PROBE_POSSIBLE.

FinOps & Gestion des Coûts : Adopter l'Infrastructure Éphémère

Les environnements cloud managés possèdent d'immenses capacités, mais ils portent inévitablement des conséquences financières substantielles. Le Plan de Contrôle managé d'EKS engendre à lui seul environ 73 $/mois. Comme je fonctionne actuellement avec une stricte marge de crédit promotionnel AWS de 53 $, laisser ce cluster fonctionner de manière continue viderait complètement mon budget en quelques semaines.

Ceci souligne l'effet de levier ultime d'une Infrastructure en tant que Code stricte. Étant donné que mon environnement complet est rigoureusement codifié et sans état, mon cluster lui-même peut agir comme une infrastructure éphémère. À la fin de mes sessions techniques, je réduis mon taux de consommation quotidien AWS pour atteindre strictement 0,00 $ en exécutant :

Bash
terraform destroy --auto-approve
Terminal affichant le résultat de terraform destroy

Exécution du démantèlement de l'infrastructure pour maintenir zéro dépense AWS pendant les heures d'inactivité.

Le lendemain matin ? Un simple terraform apply suivi d'un helm install et ma disposition cloud EKS entièrement résiliente et prête pour la production est intégralement reconstruite depuis zéro, prête à traiter le trafic.

Conclusion

La migration de mes charges de travail depuis une orchestration localisée sur site vers AWS EKS prouve que Kubernetes reste le grand égalisateur en termes de calcul. En combinant Terraform pour une infrastructure déterministe et très solide, ainsi qu'Helm pour une livraison d'applications agile, j'ai réussi à construire un pipeline de niveau entreprise agnostique de la plateforme.

Que je déploie une architecture de portfolio à deux niveaux rudimentaire ou que je maintienne une plateforme massive de traitement de l'IA de plus de 100 services, le pipeline fondamental reste complètement identique, agressivement automatisé et évolutif à l'infini.